Vagrant+UbuntuでTensorFlow1 環境構築(2017年6月版)
Vagrant+UbuntuでTensorFlow1.x 環境構築
ローカルで機械学習環境を構築して,それをそのままAWSにもっていってGPUインスタンスで計算させたいよね. でも毎回環境を構築するのはいやだからインフラ部分もコードで管理したいよね.そんな記事.
対象者
機械学習(TensorFlow)を使い始めてPython好きになった人.
AWSで計算させたいけどインフラ周りが弱い人
環境
・ Ubuntu16.04
Vagrantのインストール
(現在 Vagrant 1.9.6 2017/6/30)
https://www.vagrantup.com/downloads.html
ubuntuなのでDebian系をインストール. ダウンロードしてインストールしたいが,コマンドライン上でやりたいのでファイルのURLだけコピーしてくる
# とりあえず
$ sudo apt-get update
$ sudo apt-get upgrade


# ダウンロード
$ wget https://releases.hashicorp.com/vagrant/1.9.6/vagrant_1.9.6_x86_64.deb?_ga=2.120726475.212920124.1498783228-155634792.1498783228

# 変な名前なのでリネーム
$ mv vagrant_1.9.6_x86_64.deb?_ga=2.120726475.212920124.1498783228-155634792.1498783228 vagrant1.9.deb

# インストール
$ dpkg -i vagrant1.9.deb

# ヴァージョンの確認
$ vagrant -V
1.9.6
VirtualBoxのインストール
(現在 Virtualbox 5.1 2017/6/30)
VirtualBoxのインストールは簡単
https://www.virtualbox.org/wiki/Linux_Downloads
# とりあえず
$ sudo apt-get update
$ sudo apt-get upgrade

# インストール
$ sudo apt-get virtualbox
Vagrantのプラグインのインストール
あとから使うのでプラグインを入れておく
# AWSを使う場合はAWS用のプロバイダーもインストールします。
$ vagrant plugin install vagrant-aws

# Chefをプロビジョニングするためのプラグインをインストールします。
$ vagrant plugin install vagrant-omnibus

# プラグインの確認
$ vagrant plugin list
Vagrantの仮想イメージをダウンロード
好きな弁当箱をダウンロードしなさい.いろいろあるよ.
https://app.vagrantup.com/bento
$ vagrant box add bento/ubuntu-16.04
# 時間がかかる

$ vagrant box list
(やっと)Vagrantの起動
# 作業ディレクトリを作っておくか
$ sudo mkdir ~/myVagrant
$ cd ~/myVagrant

# ダウンロードしている仮想イメージを確認する
$ vagrant box list

# 初期化
$ vagrant init bento/ubuntu-16.04
これで,~/myVagrantのしたにVagrantファイルができているはず.その下で起動させよう.
# 起動!
$ vagrant up
これだけ
# 起動しているか確認
vagrant status
# SSHで入る
$ vagrant ssh
(やっと)Vagrantで起動した仮想Ubuntu上にTensorFlow環境を作る!!
まずは仮想OSに入ります
$ vagrant ssh
本家をそのままpython環境を構築する. (2017/6/30)
ヴァージョンを確認.おそらく2.7がデフォルトで入っている.
$ python -V
python 2.7.x
もちろん時代はPython3.xなので,3.xで環境構築する
# pipやらvirtualenvやらを入れていく
sudo apt-get install -y python3-pip python3-dev python-virtualenv

# virtualenvで環境を作る.ここではenvを~/tensorflowディレクトリを作って指定している(適当)
virtualenv --system-site-packages -p python3 ~/tensorflow

# 仮想環境に入る
source ~/tensorflow/bin/activate

# pipを使ってtensorflowを入れる
pip3 install --upgrade pip3
pip3 install --upgrade tensorflow
# pip3 install --upgrade tensorflow-gpu
終わり.
tensorflowが入っているかテストしよう.
TensorFLowでとりあえずMnist
http://qiita.com/mine820/items/4c76d8293188f83000d6
以下のコードをPythonコンソールに適当にコピペしまくる.
from tensorflow.examples.tutorials.mnist import input_data
mnist = input_data.read_data_sets("MNIST_data/", one_hot=True)

import tensorflow as tf
x = tf.placeholder(tf.float32, [None, 784])
W = tf.Variable(tf.zeros([784, 10]))
b = tf.Variable(tf.zeros([10]))
y = tf.nn.softmax(tf.matmul(x, W) + b)

y_ = tf.placeholder(tf.float32, [None, 10])
cross_entropy = tf.reduce_mean(-tf.reduce_sum(y_ * tf.log(y), reduction_indices=[1]))
train_step = tf.train.GradientDescentOptimizer(0.5).minimize(cross_entropy)

sess = tf.InteractiveSession()
tf.global_variables_initializer().run()
for _ in range(1000):
    batch_xs, batch_ys = mnist.train.next_batch(100)
    sess.run(train_step, feed_dict={x: batch_xs, y_: batch_ys})


correct_prediction = tf.equal(tf.argmax(y,1), tf.argmax(y_,1))
accuracy = tf.reduce_mean(tf.cast(correct_prediction, tf.float32))
print(sess.run(accuracy, feed_dict={x: mnist.test.images, y_: mnist.test.labels}))
計算結果
0.91 (成功!)
以上.
次回はこの手続きを全てvagrantで行わせます.
楽してAWSで計算させよう.
UbuntuでEthereum その1(2017年6月版)
UbuntuでEthereum その1(2017年6月版)
参考 http://qiita.com/hshimo/items/8b69975d40466022f278
ポイント –devオプションを使い開発用gethを立ち上げる.(DAG等の大きなファイル作成の必要がなくなる)
gethを使うまでには
- Ubuntuにgethをインストールする
- gestion.jsonファイルを作成する
- gethを初期化する
- personを作成する
- personをunlockする
- マイニングする
- 送金する
- トランザクションの確認
記事執筆時点でのバージョン
geth 1.6
1. ubuntuにgethをインストールする
sudo apt-get install software-properties-common
sudo add-apt-repository -y ppa:ethereum/ethereum
sudo apt-get update
sudo apt-get install ethereum
2.1. 環境を作る
まずはイーサリアムの環境を作るディレクトリを作成する. ここではhome/fifi/ethereumとする.
mkdir /home/fifi/ethereum
2.2. gestion.jsonファイルを作成する
genesis.json genesis.jsonファイルを作業スペース(/home/fifi/ethereum/genesis.json)下に格納する.
{
    "config": {
        "chainId": 15,
        "homesteadBlock": 0,
        "eip155Block": 0,
        "eip158Block": 0
    },
    "difficulty": "200000000",
    "gasLimit": "2100000",
    "alloc": {
        "7df9a875a174b3bc565e6424a0050ebc1b2d1d82": { "balance": "300000" },
        "f41c74c9ae680c1aa78f42e5647a62f353b7bdde": { "balance": "400000" }
    }
}
2.3 プライベートネットワークを初期化
geth --datadir /home/fifi/ethereum init genesis.json

// 下でも初期化できた
cd /home/fifi/ethereum
geth --datadir ./ init ./genesis.json

// 開発用でgethを立ち上げたい場合は、--devオプションをつける.
geth --dev --datadir ./ init ./genesis.json
初期化した後にこのデータディレクトリにアクセスするには以下のコマンドを実行する
geth --datadir ./ console
起動には複数のオプションがある
 --datadir /home/fifi/ethereum/ : data-dir-path
 --networkid 15 : 仮想ネットワークのID(適当) (例)1, 12, 100
 --bootnodes <bootnode-enode-url-from-above> :
--mine: mining enable
--minerthreads=1
--etherbase=0x0000000000 : etherbaseとなるアカウントの指定
3.1. personを作成する
> personal.newAccount("user1")
INFO [06-26|14:07:03] New wallet appeared                      url=keystore:///home/fifi/.ethereum… status=Locked
"0x3260c0b494dd9b8715d02bbbfdc6527135ad97b6"
指定する文字列(例では"user1")がパスワードとなるので覚えておく.(Unlock時に使用する)
3.2 personのUnlock
> personal.unlockAccount(eth.accounts[0])
Unlock account 0x3260c0b494dd9b8715d02bbbfdc6527135ad97b6
Passphrase:  (パスワードを入れる)
true
3.3 etherbaseを設定する
マイニングした報酬をあるアカウントに紐つけます
> miner.setEtherbae(eth.acthcounts[0])
> eth.coinbase
'0x59c444d6c4f4187d1dd1875ad74a558a2a3e20b6'
4. 送金する
> eth.accounts // 登録されている2つのアカウントを表示。
['0x24afe6c0c64821349bc1bfa73110512b33fa18e1', '0x59c444d6c4f4187d1dd1875ad74a558a2a3e20b6' ]
> eth.getBalance(eth.accounts[0]) // etherbaseである1番目のアカウントにetherの持ち高がある(採掘の報酬)。
'72500000000000000000'
> eth.getBalance(eth.accounts[1]) // 2番目のアカウントにはetherの持ち高はない。
'0'
トランザクションを作成する
> eth.sendTransaction({from: eth.accounts[0], to: eth.accounts[1], value: web3.toWei(5, "ether")}) //送金の実行。アカウントのパスワードの入力を求められるので従う。実行結果としてトランザクションIDが返される。
Please unlock account 24afe6c0c64821349bc1bfa73110512b33fa18e1.
Passphrase:
Account is now unlocked for this session.
'0xc86c2a5bdf651f54095eca87e487d4f68f12030dd559f0377e9e7bf1566b9b28' →トランザクションの番号
トランザクションの情報を調べる
先に送信したトランザクションの番号を控えておき,情報を調べる
> eth.getTransaction('0x5fd0bdcccb379a8b4034668464ad9a499a8a6b7801ed66ac23e4df3d67ec64a5')
{
  blockHash: '0xeef0f74bc51ecb9f3d64099fa4f3c1651af36a632380d41dd987e8e7064a5276',
  blockNumber: 11076,
  from: '0x868d840e872df5134a3be6f7b68e52cb680fe3ac',
  gas: 90000,
  gasPrice: '55928534329',
  hash: '0x5fd0bdcccb379a8b4034668464ad9a499a8a6b7801ed66ac23e4df3d67ec64a5',
  input: '0x',
  nonce: 0,
  to: '0x2efbdc840746c862b63077643e5b7dd8bebb8448',
  transactionIndex: 0,
  value: '3000000000000000000'
}
トランザクションを送っただけでは,送金はされない.だれかがマイニングする必要がある.
自分でマイニングする.
miner.start()
適当なところでストップ
miner.stop()
> eth.getTransaction("0x0f61531af0dd600fd37cf0eb85cb131fc87d37d06c4e00b95cf1c847e612a640")
{
  blockHash: "0x936cd2d85afc1eefa6c0f4f81555c75a0c9e62b4f3780f2dafe769d33cd93948",
  blockNumber: 208,
  from: "0xdce41c68345bf699aa82ca2cce29fdf58e4b3b45",
  gas: 90000,
  gasPrice: 0,
  hash: "0x0f61531af0dd600fd37cf0eb85cb131fc87d37d06c4e00b95cf1c847e612a640",
  input: "0x",
  nonce: 0,
  r: "0x285a39079b67c3e3a509bdba4746342accb96093d3810419c9a2681c39c7ead5",
  s: "0x619519553f55c555acfcbfdba69a251446bc3baf1f00c51783de3c3fd6c61b1d",
  to: "0xffa054f546f2edf37d0515f531421ffecbb55ef8",
  transactionIndex: 0,
  v: "0xa96",
  value: 3000000000000000000
}
内容の詳細はチュートリアルを参照 https://book.ethereum-jp.net/first_use/sending_ether.html
> eth.getBalance(eth.accounts[1])
3000000000000000000
etherが増えていることを確認
リファレンス
コマンド一覧
- 起動
geth console
geth --bootnodes "enode://pubkey1@ip1:port1 enode://pubkey2@ip2:port2 enode://pubkey3@ip3:port3"
geth --dev console

- personal
personal.newAccount();
personal.unlockAccount(eth.account[0])

- eth
eth.getBalance(eth.accounts[0])
eth.sendTransaction({from: eth.accounts[1], to: eth.accounts[0], value: web3.toWei(3, "ether")})

- admin
admin.nodeInfo
admin.addPeer(enodeUrlOfFirstInstance)

-miner
miner.start()
miner.stop()
miner.setEtherbae(eth.accounts[0])

'''
NAudioで信号処理 (その1)
チュートリアル その1
NAudioを使ってWaveファイルの再生
C# Audio Tutorial 1 - Wave File with NAudio

肝は、WAVファイルをロードして、DIrectSoundで再生する。
wave = new NAudio.Wave.WaveFileReader(open.FileName);
output = new NAudio.Wave.DirectSoundOut();
output.Init(new NAudio.Wave.WaveChannel32(wave));
output.Play();
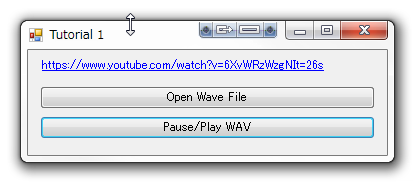
メインのソースコードは以下のようになる。WAVの再生には、WAVファイルの選択->WAVのReaderの設定->出力先を指定->再生開始。のほかにも再生中断/再開や、再生が停止されたときのDispose処理が関わってくる。このチュートリアル(その1)では基本的なWAVファイル再生をベースとして、周辺のプレ処理、クロージング処理を実装しているので注目して欲しい。
using System;
using System.Windows.Forms;

namespace Tutorial1
{
    public partial class Form1 : Form
    {
        public Form1()
        {
            InitializeComponent();
        }


        private void Form1_Load(object sender, EventArgs e)
        {
            button_PauseWav.Enabled = false;

        }

        private NAudio.Wave.WaveFileReader wave = null;

        private NAudio.Wave.DirectSoundOut output = null;

        private void button_OpenWav_Click(object sender, EventArgs e)
        {
            OpenFileDialog open = new OpenFileDialog();
            open.Filter = "Wave File (*.wav,*.WAV) |*.wav;*.WAV;|All files (*.*)|*.*";

            if (open.ShowDialog() != DialogResult.OK) return;

            DisposeWave();

            wave = new NAudio.Wave.WaveFileReader(open.FileName);
            output = new NAudio.Wave.DirectSoundOut();
            output.Init(new NAudio.Wave.WaveChannel32(wave));
            output.Play();

            button_PauseWav.Enabled = true;
        }

        private void button_PauseWav_Click(object sender, EventArgs e)
        {
            if (output != null)
            {
                if (output.PlaybackState == NAudio.Wave.PlaybackState.Playing)
                    output.Pause();
                else if (output.PlaybackState == NAudio.Wave.PlaybackState.Paused)
                    output.Play();
            }
        }

        // Wave関連のインスタンスをDispose
        private void DisposeWave()
        {
            if (output != null)
            {
                if (output.PlaybackState == NAudio.Wave.PlaybackState.Playing) output.Stop();
                output.Dispose();
                output = null;
            }
            if (wave != null)
            {
                wave.Dispose();
                wave = null;
            }
        }

        // フォームが閉じられたとき、Wave関連のインスタンスをDispose
        private void Form1_FormClosing(object sender, FormClosingEventArgs e)
        {
            this.DisposeWave();
        }


    }
}